
Today was one of those days where I didn’t let lack of sleep or a sicky baby slow my roll! Baby Bub has a cold… again- this time, it is accompanied by a cough. I just feel so sorry for him. A cold is no fun and this is the second one in less than two months. So, I didn’t get upset when he woke up at 12:30AM and basically just wanted to be rocked and pretty much refused to be put back in his own bed. I ended up having to lay down with him in the twin bed in his room to get him back to sleep and into his crib. I crawled back into my bed around 2. And yes, he was awake and ready to face the day at 7AM.
So you can imagine how surprised I was with myself when I decided to work on removing the wallpaper in the entry way and stairwell! This is the last big wallpaper removal project left. At this point, the only wallpaper left in our house is in my dressing room. Bub and I have removed wallpaper in 5 rooms with the entry way and stairwell being the 6th! And we have finally got it down.
 The first projects were the kitchen and the dining room. Both of which were a nightmare! I’m not exaggerating! You can ask my sister, Sawyer- she was the only one
 willing brave enough to help us. Bub and I bought this house as a foreclosure. The previous owners… well, they left it in a style I like to call “country chic 1992”. But, that’s all they left. They took the front porch light fixtures, the thermostats and the kitchen sink just to get the list started.  Also, they were really into wallpaper because we found layer after layer after layer of wallpaper in all the rooms we have removed wallpaper. These first two rooms carry the scars of our initial learning curve.
I watched some videos on YouTube. Sawyer watched some videos on YouTube and together with Bub we got to work removing wallpaper. I was convinced we needed a steam-remover… it worked okay, at best. I was convinced we needed to score the wallpaper first so that the steam could penetrate the wallpaper and loosen the adhesive. Yeah- no. To give ourselves a little credit- the kitchen had 3 or 4 layers of wallpaper and a layer of paint that we removed. The dining room had 5 layers of wallpaper and a couple layers of paint too! In places in the kitchen we actually removed the top layer of sheet rock along with the last layer of wallpaper adhesive (which had to be patched). It was grueling.
You can understand why we stayed away from wallpaper removal for a while… but, the alternative was living with wallpaper that was neither of our tastes. We tackled the bathroom off of the den and then a year later the bathroom upstairs- I was delusional enough to think the nursery was actually going to be up there. Back in February we finally made a move on the master bathroom. You can get some glimpses of the before and after here. We still have not finished the master bath because the countertop needs replacing but, we cannot find the right one- so, we keep looking. But, it was in the master bath that we finally, actually Bub, perfected our wallpaper removal technique!
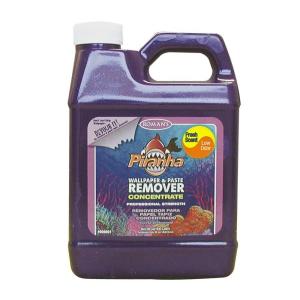 The first step is to remove the outer layer of decorative paper. The second is to spray what remains still adhered to the wall with Pyranha wallpaper removal spray. Yes, this brand. No, I wouldn’t sub any other brand. You can find the concentrate at both Lowe’s and Home Depot. We buy the concentrate and then mix it stronger than the directions recommend. You thoroughly spray the wall and let it sit maybe a minute or two and then just peel the adhesive paper off the wall- dare I say, easy-peasy!
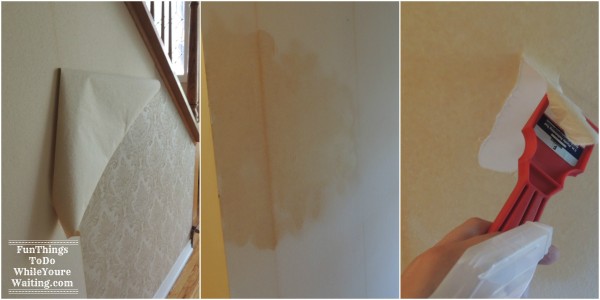
I made short work of the first layer of wall paper while Baby Bub played with a new toy that he is absolutely enthralled with- it’s a walker that he can push- he loves it! And then I came back with the Pyranha spray while he finished his afternoon nap (the nap beginning being in my car).
Bub and I have settled on gray for the entryway and stairwell- now we are trying to figure out which gray! I am excited to get that part of the house de-wallpapered and painted and set up. I have some ideas on how to really showcase our style in the front hallway that I will certainly share as it unfolds.


Five layers of wallpaper…. ugh!!!!!