
*Admin Note*
At FTTDWYW, we have the smartest friends. And, like us, they have a wide variety of interests. Everyone has something they are better at than most people and we are so honored to share their expertise with the world! Our first guest post is by Sheila Ralston- yarn-crafts goddesss, criminology enthusiast, cat lover, and queen of accessible Indian cuisine. She was clutch crucial during the proof-reading phase of our blog and is such a cool person to know. Today, she shares two great knitting patterns for kittehs with our readers. In addition to us posting five-days-a-week, our goal at the blog, is to make every Wednesday ‘Guest Post Wednesday.’ So, every Wednesday, at noon (CST) we will be delivering the finest guest posts out there! Like special bonus posts!! So, please enjoy our inaugural guest post and stay tuned every Wednesday for more!

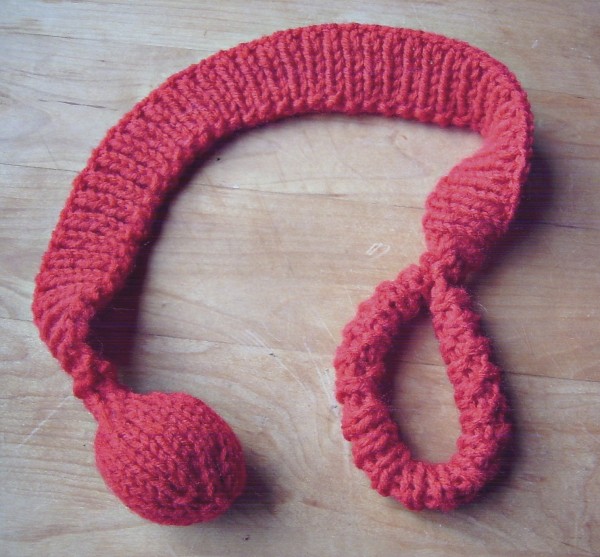
My husband Ken and I are currently fostering a sweet little black cat with eyes of creamy jade whom we have named Miao Yin. Inspired by this free crochet door-hanger cat door pattern from Lion Brand that I found on Ravelry, I decided to make one for Miao Yin to give her something to play with in her room when we weren’t there to dangle things in front of her. I tried to make a knitted version using Nicky Epstein’s version of the spiral ruffle (from Knitting on the Edge, where you cast on, do a double increase in each stitch, then cast off. This made a plenty twisty but disappointingly non-bouncy ruffle. Returning to the LB pattern, I found the crocheted spiral rope to be of similarly ersatz bounciness. Fearing Miao Yin would scorn to scrabble at such obviously dead prey, I decided to try a rope of ribbing worked width-wise instead. I made it about 25” long, sewed and folded over one end to make the loop to go over the door handle, picked up 5 stitches along the opposite edge to make a ball attachment, and stuffed it with a little polyester fiberfill and a jingle bell. Behold! (Full pattern below).
It’s not super-bouncy either, but it does stretch out and snap back when released, so at least that’s something, I guess. Miao Yin pays attention to me rather than the door hanger when I’m actually in the room with her, but my husband, whose office is in the next bedroom, claims he hears her playing with it all the time. Success!
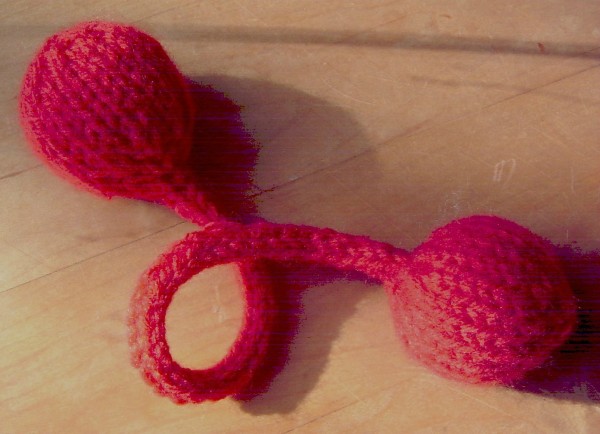
Of course, what we really want to do is get Miao Yin out of her little room altogether, but we have to get her socialized a bit more with our other two cats first. One recommended method is to get the cats to play with each other through the door, so I decided to make a toy to facilitate that, too. Inspired by the Catwarming Set from Stitch and Bitch Nation, I decided to make my own version of a rope-and-ball toy, worked all in one piece, and with a pretty short I-cord connector so that we could put one ball on each side of the door for each cat to attack (there is not much room outside the door for trying to drag a jingly ball back to one’s lair).
Miao Yin loved this so much when I first put it under the door that she ignored me for about 15 minutes while she tried valiantly to drag the oposite ball under the door. The other cats ignored all of this mayhem, but later Virgil came along and moved the toy to his side of the door, so slowly and stealthily that Miao Yin never looked up from her grooming session on my lap, then stalked off.
Cats, amiright?
Both toys are worked flat, but you will need two double-pointed needles to make the I-cord for the two-cat toy; you will also need polyester fiber-fill (or waste yarn) for stuffing, jingle bells, and a yarn needle. Gauge is not crucial, but you want to work with a needle size one or two sizes smaller than that recommended for your yarn so that the fabric is firm enough for stuffing.
Knitted Bouncy Door-Hanger Cat Toy
About 40 yards (37 m) of Worsted Weight yarn- Size 7 (4.5 mm) needles
Cast on 130 stitches, leaving a 24” (61 cm) tail for sewing
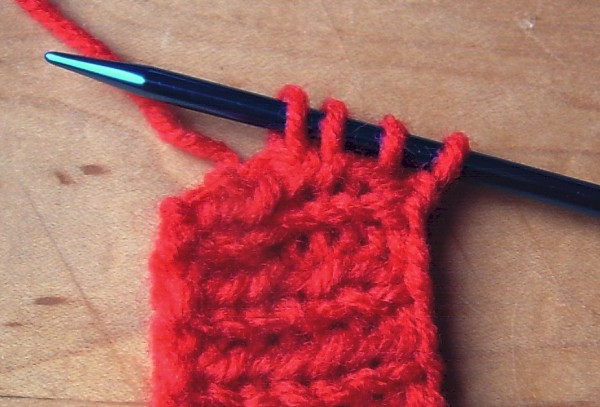
Row 1: K1, P1 across Repeat Row one 7-8 times, until piece is about 1 ½” (3.75 cm) tall and the working yarn is on the same end as the cast-on tail. Cast off across the entire piece to the last stitch, matching your cast-off tension to the cast on so that piece hangs evenly (you may need to go up or down a needle size).
Leaving the last stitch on the needle, turn the work and pick up 5 stitches along the 1 ½” (3.75 cm) edge – 6 stitches.
- Purl one row
- Knit one row
- Purl one row
Make ball attachment
- Row 1: Kfb (Knit into front and back of stitch) across – 12 stitches
- Row 2: Purl
- Row 3: Kfb across – 24 stitches
- Row 4, 6, 8, 10: Purl
- Row 5, 7, 9: Knit
- Row 11: K2tog (knit two stitches together) across – 12 stitches
- Row 12: Purl
- Row 13: K2 tog across – 6 stitches
Cut yarn leaving 10” (26cm) tail for sewing
With a yarn needle, thread through remaining stitches and pull tight to close the end of the ball. Using a mattress seam, sew the ball halfway closed, then stuff firmly with fiberfill or waste yarn and jingle bell. Finish seam, then weave the end a few stitches up the cord, then back down to the ball again. Pierce the needle all the way through the ball, pull the tail through, and snip at the surface. (This will bury the end in the ball).
To make loop for door knob, fold the opposite end of the ribbing in half lengthwise, and starting from the end, make a tube by working a mattress seam joining the cast-on to the cast-off edge (I just worked into each knit rib and skipped the purls), until the tube is about 9” (23 cm) long. Fold over the end to make a loop, and sew it securely to the ribbing, taking several stitches horizontally and vertically across the seam. Weave in the end.
Under-Door Two-Cat Toy
About 20 yards (18 m) worsted weight acrylic yarn
Two size 7 (4.5 mm) double-pointed needles
Cast on 6 stitches, leaving an 10” (26 cm) tail for sewing
Work Rows 1-13 of ball attachment pattern, above
Slide work to opposite end of needle.
Next row: Taking yarn from behind the work and starting at beginning of previous row, K2tog across – 3 stitches. Slide these three stitches to the opposite end of the needle again, and, taking the yarn from behind the work and starting at the beginning of the previous row as before, knit them. Continue working I-cord in this manner to desired length, ending by sliding stitches as if to work I-cord, but then working Kfb across – 6 stitches.
Repeat Rows 1-13
Cut yarn, leaving 10” (26 cm) tail. Sew up and stuff as for Bouncy Door-Hanger. For ball on opposite end, thread tail through cast-on stitches, pull closed, and finish as before.
Super Awesome Update:
Miao Yin took her toys and went to her forever home. But there are plenty more cats who need a place to store their toys at Hyde Park Cats (linky to the adoption page, here: http://hydeparkcatsfaq.blogspot.com/2011/05/available-for-adoption-2.html.)
Super Awesome Updated No.2:
Within 24 hours of my posting these patterns on Ravelry, frgt10 had whipped up a crocheted version of the Under-Door Two-Cat Toy. She very kindly agreed to write up her instructions, which are below. The pattern is also available in Polish on her own blog. Iga writes:
Hello fellow crocheters!
I was strongly inspired by Sheila’s knitted Under Door Two-Cat Toy (http://www.ravelry.com/patterns/library/under-door-two-ca…) pattern. In fact, I think it is brilliant idea! I feel much better in crocheting, so I decided to make crocheted version. Sheila asked me to write up all instructions, and here it is…

I don’t think the gauge matters – whatever works, as long as it fits under your door. For the record – I used YarnArt Jeans and 2,5mm hook.
Now, some tips that may help you:
Magic Ring http://www.youtube.com/watch?v=sLUaywX0-WE
Invisible decreasing http://www.youtube.com/watch?v=tZ575_ZklWk
Relief Crochet http://www.youtube.com/watch?v=F0LJiEuJjmg
How to finish off neatly http://www.youtube.com/watch?v=SMkNQAZ5Si0
- Make 6 single crochets (scs) in Magic Ring, or make chain 2 and then 6 scs in 2nd chain from hook.
- Crochet 2 scs in each stitch (12 sts in a round).
- Crochet 1 sc in first stitch (st), then 2 scs in next st (18 sts). If you are using thick yarn or you just want a small ball, stop increasing and crochet next 3 rounds evenly, 1 sc in each st (54 sts). Then go to 12th step.
- Crochet 2 scs in first st, then 1 sc in next 2 sts (24 sts). (That’s where I stop increasing.) If you think that after this round your ball is big eniugh, stop increasing and crochet next 4 rounds evenly, 1 sc in each st (96 sts). Then go to 11th step.
- Crochet 2 scs in first st, then 1 sc in next 3 sts (30 sts). If you think that after this round your ball is big eniugh, stop increasing and crochet next 4 rounds evenly, 1 sc in each st (120 sts). Then go to 10th step.
- Crochet 2 scs in first st, then 1 sc in next 4 sts (36 sts). If you think that after this round your ball is big eniugh, stop increasing and crochet next 5 rounds evenly, 1 sc in each st (180 sts). Then go to 9th step.
- Crochet 2 scs in first st, then 1 sc in next 5 sts (42 sts). Crochet next 5 rounds evenly, 1 sc in each st (210 sts).
- Decrease over two stitches, then crochet 1 sc in next 5 sts (36 sts).
- Decrease over two stitches, then crochet 1 sc in next 4 sts (30 sts).
- Decrease over two stitches, then crochet 1 sc in next 3 sts (24 sts).
- Decrease over two stitches, then crochet 1 sc in next 2 sts (18 sts).
- Decrease over two stitches, then crochet 1 sc in next st (12 sts). Don’t forget to stuff the ball firmly – now is the perfect time to do that.
- Decrease over two stitches around (6 sts).
- Decrease over two stitches, then crochet 1 sc in next st, then decrease over two stitches, then crochet 1 sc in next st (4 sts).
- Continue crocheting 1 sc in each st for as long as you need, for me it was something about 30 rounds. I used here relief single crochet, but feel free to make whatever stitch you want.
- Crochet 2 scs in first st, then 1 sc in next st, then 2 scs in next st, then 1 sc in next st (6 sts).
- Crochet 2 scs in each st (12 sts). You don’t have to make the balls even, as it is on the picture, one may be smaller or bigger.
- Repeat steps from 3rd to 13th.
- Finish off, weave in yarn ends/
I hope you enjoyed this pattern 🙂 Have fun watching your cats playing with it!

10 Comments