
 She’s done it again, folks! Our resident yarn-whisperer, Sheila, is back and showing us how to work with handpainted yarn. Handpainted yarn, although beautiful and special, can also be kind of tricksy with which to work. In today’s post, Sheila gives us some great tips on working with the yarn world’s “special snowflake” AND gives us a great sock pattern to boot! See Sheila’s other great posts here, here, here, here, and here! ~Leigh
Handpainted yarn is one of the most dangerous temptations in knitting. So beautiful in the skein, so unpredictable on the needles! In the olden days before the internet, you would mostly only encounter these siren skeins at yarn shows like the annual Stitches market, but nowadays indie dyers have their own websites and Etsy shops; others have gotten big enough to be distributed in brick and mortar yarn stores, like Chicago’s own Lorna’s Laces. Most yarn companies have begun producing their own lines of handpainted yarns, like Knit Picks’ Stroll Handpainted Sock Yarn and Cascade Yarns’ Heritage Paints. If you’re not familiar with the term “handpainted,” this article in Knitty shows the three most common methods of hand-painting yarn, and some typical results. Basically, handpainted yarn has been painted with dye in multiple color blocks rather than dipped or soaked in just one shade.
As beguiling as handpainted yarns may look in the skein, they are notorious for producing disappointing knitted fabrics. Sometimes the individual colors are lost or appear muddy when they are mixed all together in the knitting, or pool together in a distracting or ugly pattern. You may sometimes get a better idea of what a handpainted yarn might look like when knitted up if it has been re-skeined by the dyer, as discussed in this article by an indie dyer (with helpful pictures of her own work, skeined and re-skeined). Here is a picture of the sock I’ll be giving you the pattern for today, in progress next to it’s rewound cake. Pretty close, eh?
However, it’s possible to be surprised at what you get even when the dyer conscientiously provides a knitted swatch for the colorway, due to natural variations from skein to skein, as well as the different gauge and width of your own knitted fabric from the swatch. I swear the colorway Street Spirit looked both calmer and bluer in the knitted swatch provided by the good folks at Knitty and Color in their Stitches 2013 booth. There was more pooling than I expected, too, but it’s erratic enough that I don’t find it annoying.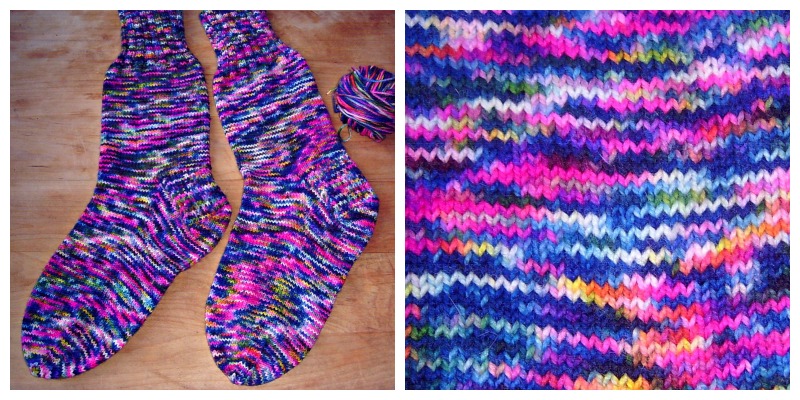 I’ve decided I like these socks the way they are; I tend to dress in muted tones, so it’s kind of fun to have that riot of color hiding in my snow boots (just like Sister Jude’s fancy red lingerie, except 100% less sexual). However, one fool-proof way to break up pooling (and tone down crazy colors) in handpainted sock yarns is to combine them with a solid color in a two-color pattern. Behold my evolution in figuring out how to use some Sweet Georgia Yarns handpainted I was given by a friend:
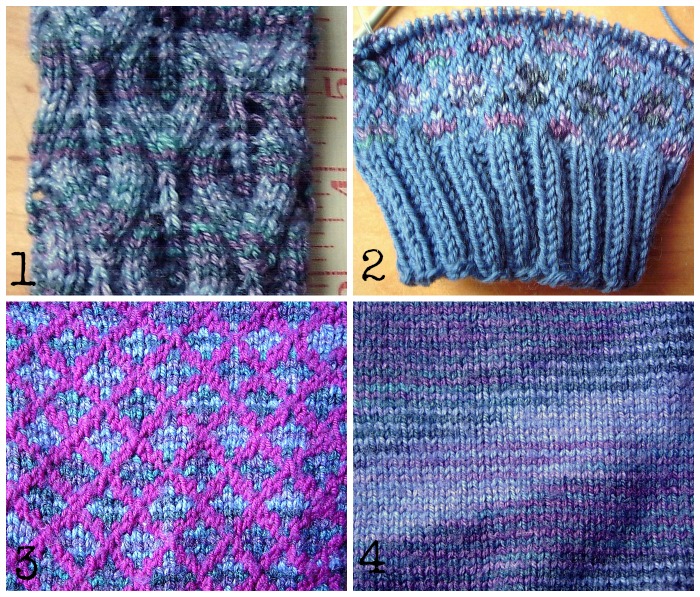
1. Yarn too loud and pooley for lacy pattern to show well. Ripped out.
2. Contrast color not contrasty enough. Ripped out.
3. Just right. Ah!
4. Letting the leftover yarn go ahead and pool if it wanted to for the 2nd pair, but in a plain stitch so I wasn’t wasting my time on a pattern stitch.
As you see above, the other upside of combining handpaints with solid colors is that you can get two pairs of socks out of a 400-450 yard skein instead of just one, which is a good way to rationalize buying the spendier hand-dyed yarn in the first place. I used Deborah Tomasello’s WINDOWPANE: Mixed Berries Socks pattern for the sock on the left above; some other good patterns for toning down handpaints are Well Spotted by Jodie Gordon Lucas and Ugly Ducking Socks by Karen Aida. These last two patterns use black as the contrast color to produce a stained glass effect.
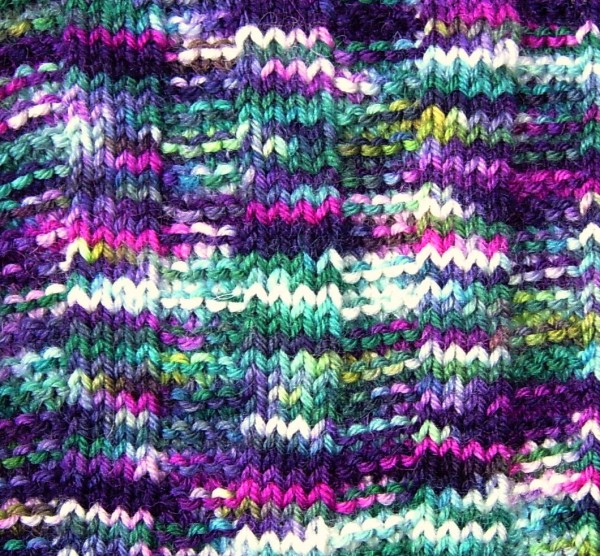
I decided to go ahead and let the other lovely skein I picked up at Stitches in 2013 from Cloudlover Yarns pool too, though with an alternating knit/purl stitch pattern to vary how the color showed across the knitting. I thought a Sweet Tomato Heel would look interesting in a handpainted yarn, so I threw that in too. I give to you: 
Garter Rib Socks
Needles: Size 1.5 (2.5 mm) double-pointed needles, or size needed to make gauge. A short circular needle in a smaller size comes in handy for holding the inseam stitches while making the heel.
Gauge: 32 st per 4 inches/10 cm.
Sizes: 8” (9”, 10”) finished circumference
Cuff
Cast on 64 (72, 80) stitches.
Round 1: Knit
Round 2: P2, *K4, P4* rep from * to last 2 st, P2.
Repeat Rounds 1-2 until piece measures 8” or desired length to heel, ending on Round 2.
Work Cat Bordhi’s Sweet Tomato Heel.
Bordhi has asked that designers link to her instruction video rather than rewriting her instructions.
 You will work three wedges, dividing stitches on needles as follows on needles one, two and three: 22,20,22 (24, 24, 24), (27, 26, 27). Work three wedges as instructed, leaving 8 (8, 10) stitches unworked at center, and ending up with 9, (10, 11) pairs of stitches on either side of center before the “Thanks, Ma” round.
Continue in pattern across the inseam between wedges while making the Sweet Tomato Heel:
Row 1: K
Row 2: K 4 (6, 7), p4, k4, p4, K 4 (6, 7)
Continue with this pattern after heel is finished, knitting all needle 1 & 3 stitches on all subsequent rounds, until sock measures 2” (2 ¼”, 2 ½”) inches short of desired length.
Toe
Rearrange stitches as follows on needles one, two, and three (where needle one begins at center back of heel): 16, 32, 16 (18, 36, 18), (20, 40, 20).
Round 1:
Needle one: Knit to last 3 st, k2tog, k1.
Needle two: K1, SSK, K to garter rib and either P4, K4, P4 or knit across as established, to last 3 st, k2tog, k1.
Needle three: K1, SSK, K to end
Round 2: Knit around all three needles
Repeat Rounds 1 & 2 until 32 (36, 40) stitches remain. Repeat Round 1 until 12 stitches remain, but knitting plain across central stitches on needle 2 between decreases on every round. Break yarn and graft remaining stitches together.


One Comment