I don’t know about you, but I am constantly bemoaning the enormity of my t-shirt collection. I have nice t-shirts which go on hangers. I have t-shirts meant for the gym. I have t-shirts in which I sleep. Obviously, what I’m saying is I have a lot of t-shirts. If you have schmancy t-shirts that you paid lots of money for, then move along… this post is not for you, but if you aren’t afraid to get a little crafty, and have a pair of scissors- then the t-shirt mod world is your oyster, kid.
T-shirt mods (or modifications) are some of the quickest ways to add your individual fashion flare to a t-shirt. They aren’t just for Panama City Beach in the late 80’s. You might be asking yourself, “self, I wonder… can you modify ALL shirts?” To which I would respond, “nope!” Cotton t-shirts are ideal for this technique because the fabric does it’s own finishing work for it. Normally, in sewing, in order to finish a raw-fabric edge, you would need to have a seam and seam allowance and all other sorts of bidness. But with cotton jersey, the fabric simply rolls over onto itself- provided you don’t make your cuts too close together.
I am all about t-shirt mods. Almost all of my sleeping/gym shirts are modified in some way. I remember becoming aware of people modifying their own t-shirts by watching the incomparable Connie Britton on Friday Night Lights as Tami Taylor. All of her sleeping shirts were modified… either into a v-neck collar (see below right), or notched at the top of the neck. Anyways, the other day, I was listening to a Billie Piper-era Doctor Who rerun on Netflix while I was cleaning out the refrigerator. I walked into the living room to get my water and noticed that she was wearing a t-shirt mod style I hadn’t seen before. I, of course, paused it and screen capped it (see below left).
See? Pretty simple. Cut off the collar and then cut two wedges on each shoulder seam. When modifying t-shirts, there are a few things to remember. Start small. If you are worried about a hole being too big then err on the small side first. You can always cut more, but you can never un-cut. Always check you’re progress as you’re going… and try and make a game plan of how you want to proceed. And if you are worried about ruining the t-shirt, practice on one from the rag bag first.
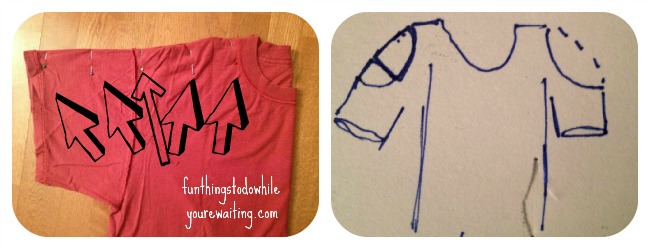
Start by flipping your t-shirt inside out and folding it in half, length-wise. Make sure all of your seams line up evenly and pin regularly (see below left).
Once you are folded and pinned, make a plan of attack as to how you think this is going to go down. Notice in the picture (above, right) that on the right sleeve I’ve drawn a curve, and then on the left sleeve I’ve drawn a different shape. After making my drawing, I went back and studied my source material again and decided on the left sleeve approach.
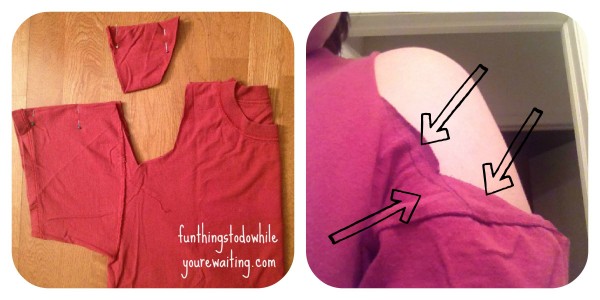
Go in and make your first pass and remember to start small. Once you’ve cut through all of the layers (which should happen in one fell swoop thanks to the fact that we folded our t-shirt) you are going to want to try it on. Once you’ve got it on you can see where it isn’t working. Like in the picture above (right panel), you can see where I have drawn with a pen where I want to edit my cut when I go back in.
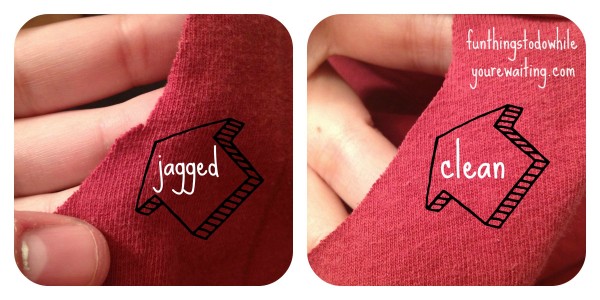
Re-pin your seams back together as close to the original cut as possible and make any edits to your original cutting. Now, try it on again and repeat until happy. When you are satisfied with the shape, make sure all your cuts are clean (see below)!
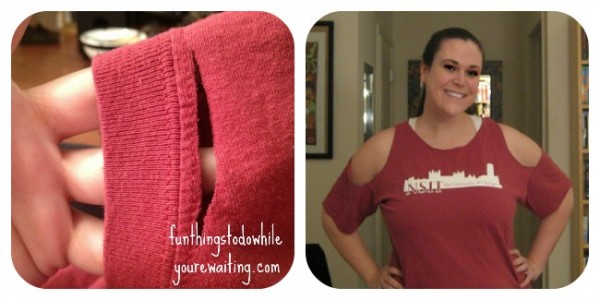
Now all that is left is to trim your collar to your liking. Me, I just fold my collar and snip into it right beneath the thread line (see below, left). I follow the thread line all the way around until the collar is detached. You can modify your neck line depending on the shirt… but again, you can always cut more, but it almost impossible to re-attach. And voila! You’ve got yourself a t-shirt mod. This one is headed straight to the gym! If any of y’all try this, let us know! And as always, if you have any questions, hit me up!


7 Comments