
 Having the ultimate beach kit has been a goal of mine since we moved to the left coast. I should probably have aimed higher…but, I digress. I wanted to become one with the beach culture out here… to make going to the beach something we did frequently and with as little muss as possible. Yes, muss. Gone are the days when all you needed at the beach is a bathing suit and small bath towel. At least for me. These days it’s all about sunscreen, hydration, and comfort over he-yuh. So, when I was mentally putting my dream beach kit together, I knew I wanted an umbrella, a cooler full of fun, and a beach blanket that went on for days. The beach blanket part was key. I wanted something so much larger than a regular or even beach sized towel. I wanted room to super-spread out. A place where I could put all my stuff and it wouldn’t get knocked into the sand. For as much as I love the beach, I hate sand. As Coralie said in her great post about camping on the beach, “you just have to accept the sand and get over it.” And it is true. No matter how hard you try, sand will always find its way into eerverything. But, man do I try and mitigate that as much as possible. I put my electronics in a Ziploc. I wipe my feet when coming from the sand. I keep all food tightly contained. I love sand on the beach… not in my car, or carted back into the house upon return. So, in addition to a beach blanket, I also knew I needed a tarp. I researched tarp sizes and reckoned (yes, reckoned) a 9’x12′ tarp was the size I wanted. And, as such, I wanted the blanket to also be roughly that size. After purchasing the tarp, an attempt was made to unfold it for a size gauge. Since I didn’t have 9’x12′ of unfurnished, unobstructed floor space, it was kind of hilarious and I folded it up with its dream of being fully unfolded realized only at the beach. I figured I would just make the blanket and then trim the tarp to fit the blanket!
I had seen a pin floating around on Pinterest about using old, extra towels you had around the house to make a pillow cover for a beach pillow. Ever since then, the idea of using old towels to create a beach blanket has been sitting in my craw. You KNOW how much I love upcycling. Upon finding fewer old towels than I remembered in our linen bin, recalling the two towels tossed after a spill during our big move, I started researching alternatives. Terry cloth was prohibitively expensive at the fabric store for a project this size and the colors tended to lean more towards baby-bath-layette set than fun-in-the-sun. I wanted something that looked like a bright, beach towel. So… I bought a bunch of bright, beach towels. Towels aren’t cheap, so I price- sourced and found some cute ones for $3.50/piece. I bought eight. Hoping to use this beach blanket for many years, I didn’t blanch too much at the price. I made sure to buy towels that were all the same size to make sewing easier. I got the towels home and had the same problem I had with the tarp. When I laid the towels out, they took up more space than my living room floor could accommodate (see left picture). Additionally, I couldn’t visualize how I was going to piece them together. The rectangles didn’t lend themselves to a pleasing pattern, So, I turned the rectangles into squares by cutting all the towels in half width-wise.
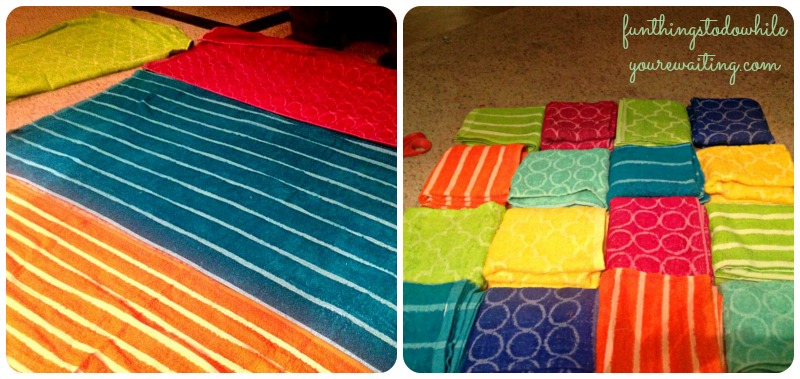 Having 16 squares, instead of eight rectangles allowed me to make a square quilt. With each piece folded, I was able to shrink the project down to a 4×4 grid that I could easily manipulate so I could design the layout (see above right pic).
It should come as a surprise to no one, and I have certainly said it here before, but having the right tool for the job makes all the difference. Enter my four-thread serger. My mom’s dear friend Rachel (who is also one of my fairy godmothers) is also the woman who taught me to sew. She owned a laundry and alterations business and I spent many an evening there learning from a master. Because she was an actual professional, she had many pieces of specialty equipment upon which I quickly became spoiled. Among them was a serger. For those of you unfamiliar with it, a serger is a separate machine from the traditional sewing machine. A serger sews over the edge of fabric, creating a professional edging and preventing fabric unraveling. It also trims the overage. As Josh said, “huh?” Maybe this will help…
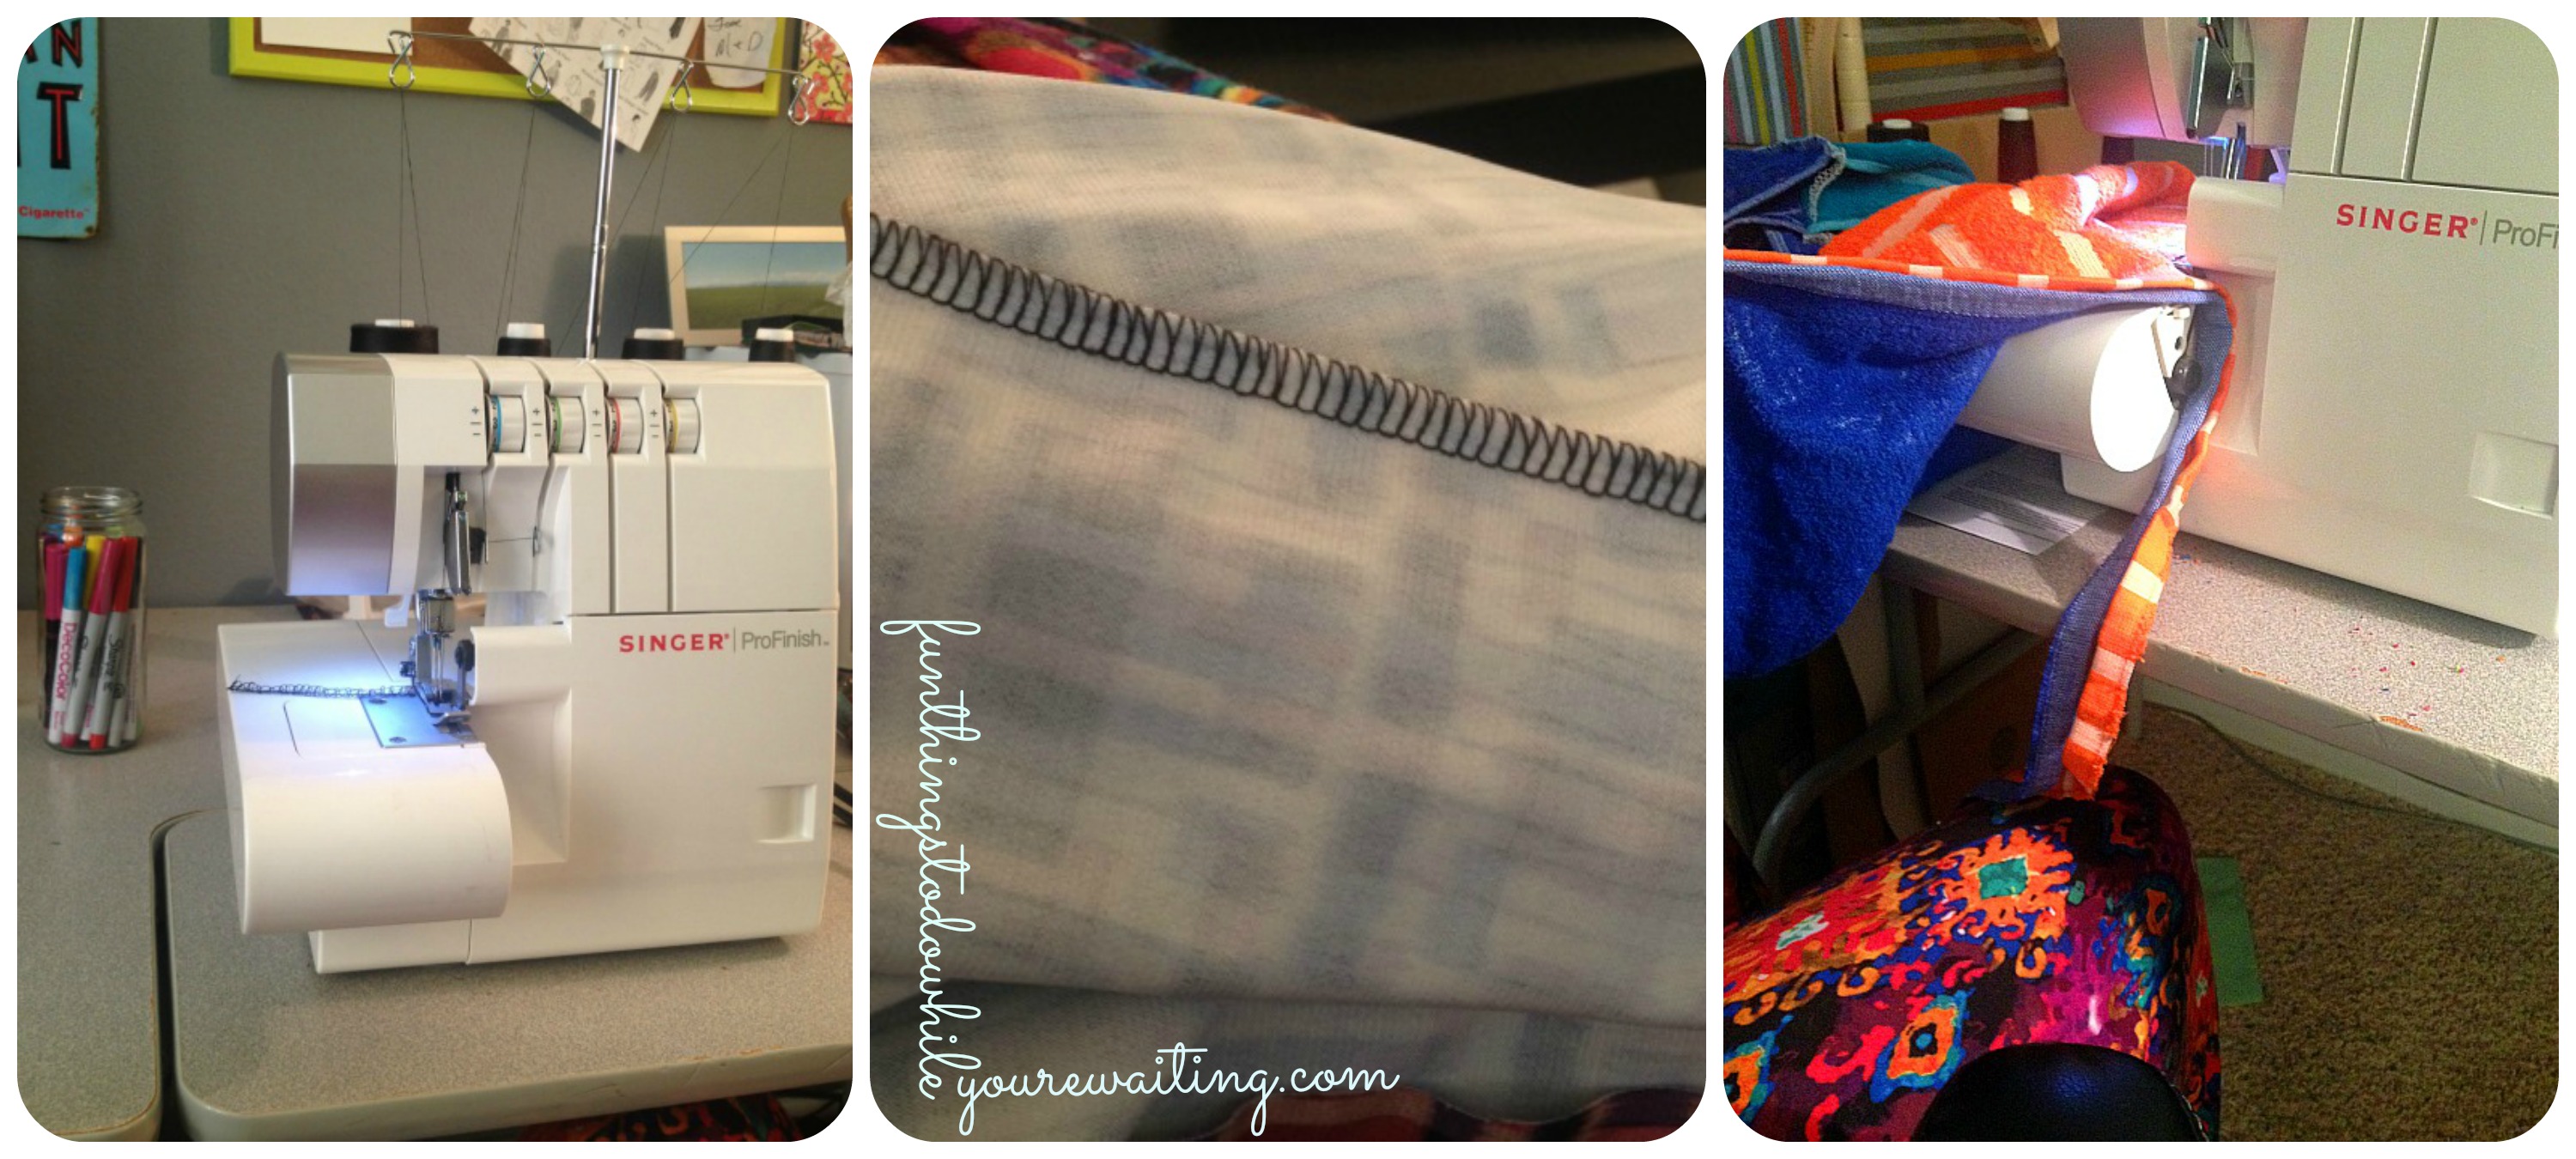
The picture on the above left is a serger. See the four-thread spools in the picture? The middle pic is the stitch it makes. The third picture shows how a serger also cuts off the excess trim. A serger saves trimming time and can do all sorts of fun things. It isn’t necessary for the basic home sewer, but it sure is nifty. A few Christmases ago, my sweet, thoughtful Grandmama gifted me with this shiny number. Since it didn’t fit in a suitcase, my serger lived in Lavonia (having taken up residency in Rachel’s home studio) until recently when it was mailed to me for my birthday. How fortuitous! The perfect machine for this project as terry cloth can unravel and I hate trimming! Additionally, edging with your sewing machine is something of which I am not a huge fan. That is another reason why I love t-shirt-mods! Jersey edges itself. But, with a serger, it sews, edges, and trims all in one. Boom.
Once I had my towel squares in a pleasing pattern, I began to assemble them. I decided the best course of action was to sew four squares into a strip, and then make three more strips of four. Once I had four strips, I would then assemble those together the same way. Since I cut the towels in half, there was an already edged side and a raw edged side.
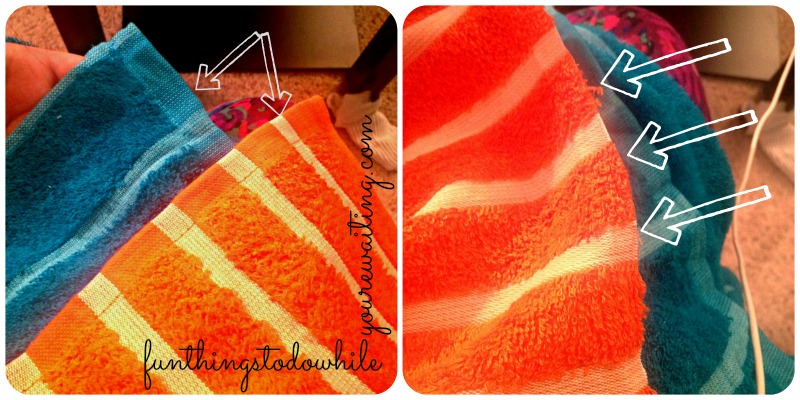 See the already edged sides on the left and then the other, raw edge side of the orange towel on the right? Wanting to use the already edged side as the edge to my blanket, I pieced the top row together as such:
 The raw edges sewed together beautifully and I used the trimming feature of the serger to cut off the edge set in the middle of the strip. The top squares show the assembly order of the first strip and the pink shows how you connect the strips to each other.
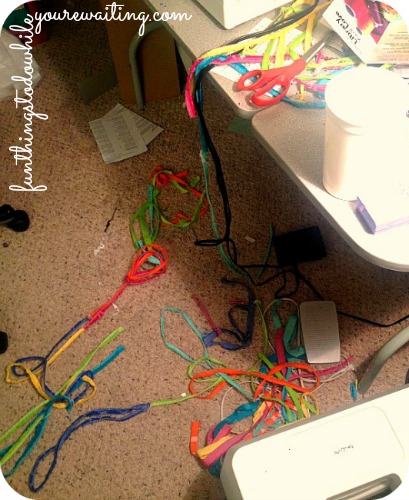 The project came together so quickly. All told, it took me about an hour and a half. Which, in sewing terms is pretty fast… especially considering the size of this beast. Check out the hilarious pile of trimmings from the serger. It looked like a box of Fruity Pebbles exploded in my craft-a-torium. But, once completed, I folded the blanket and stuck it in a quilt bag from the dry-cleaners (see… always re-using stuff!) and put it by the door in preparation for Saturday beach day!
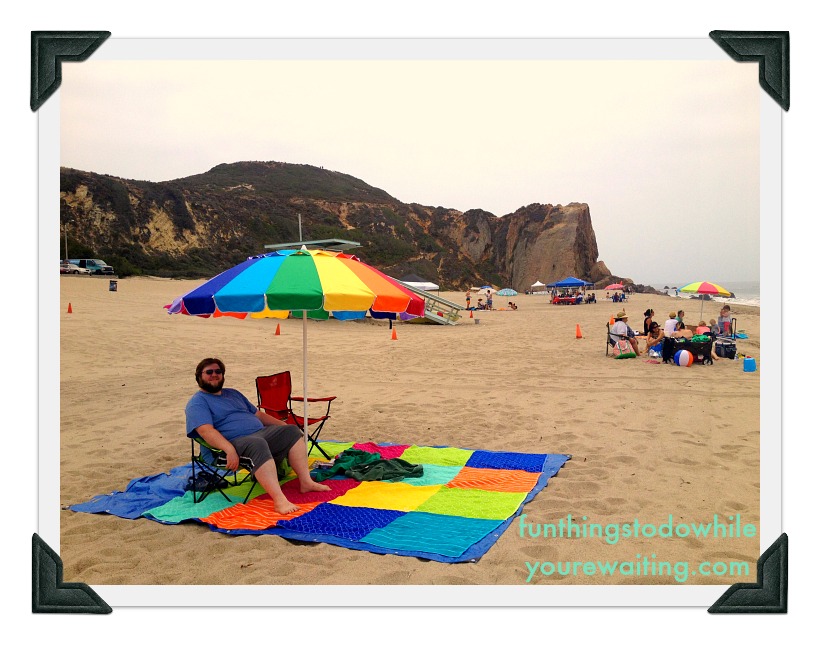
Along with the blanket and tarp, we also acquired a beach umbrella (and subsequent umbrella anchor) and an awesome cooler with tons of exterior pockets. Along with snacks, sammiches, pop-up chairs, water, sangria, books, and sunblock, we hit the beach. It was so sweet. Just check out the view in the below left picture.
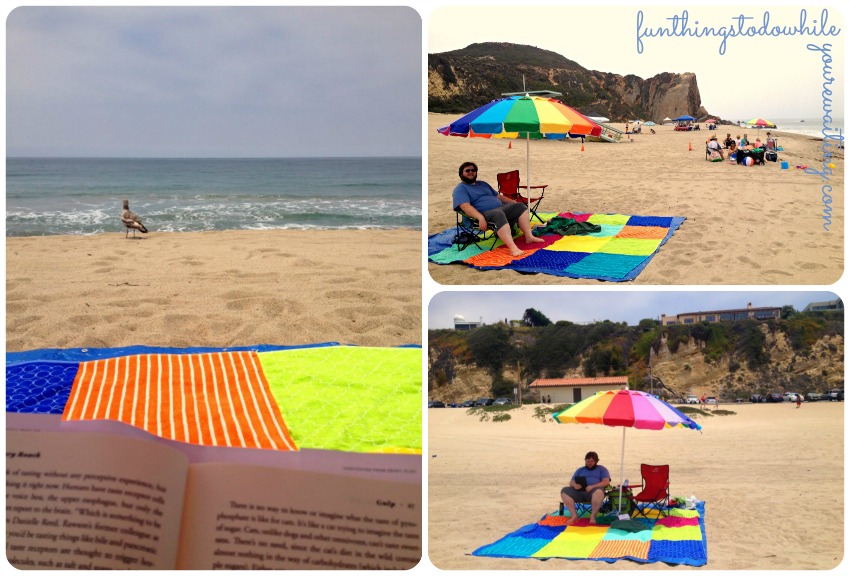
The blanket was a hit. There was so much room that if I wanted to lay out in the sun, I didn’t have to fold up my chair. The additional tarp length actually came in handy as a landing space for our cooler and a place to brush off our feet, so it stayed. I’ve thought about maybe adding four corner anchors, or attaching a snap to the tarp and blanket to keep them together when needed… but, if that never happens, I will still be happy as a clam!
Do you have any beach tips? What do you think? Is my setup not the brightest thing you’ve ever seen? So bright!


One Comment